Here's Everything You Need to Know About Water Damage Restoration
Are you in the dark when it comes to water damage restoration? No worries, we will shine some light on the subject to help you better understand the ins and outs of water damage restoration.
In this comprehensive guide, we will cover 22 important steps involved in water damage restoration.
Step 1: Understanding Water Damage Restoration
Water damage restoration refers to the process of repairing and restoring a property that has been affected by water damage. This can occur for various reasons,
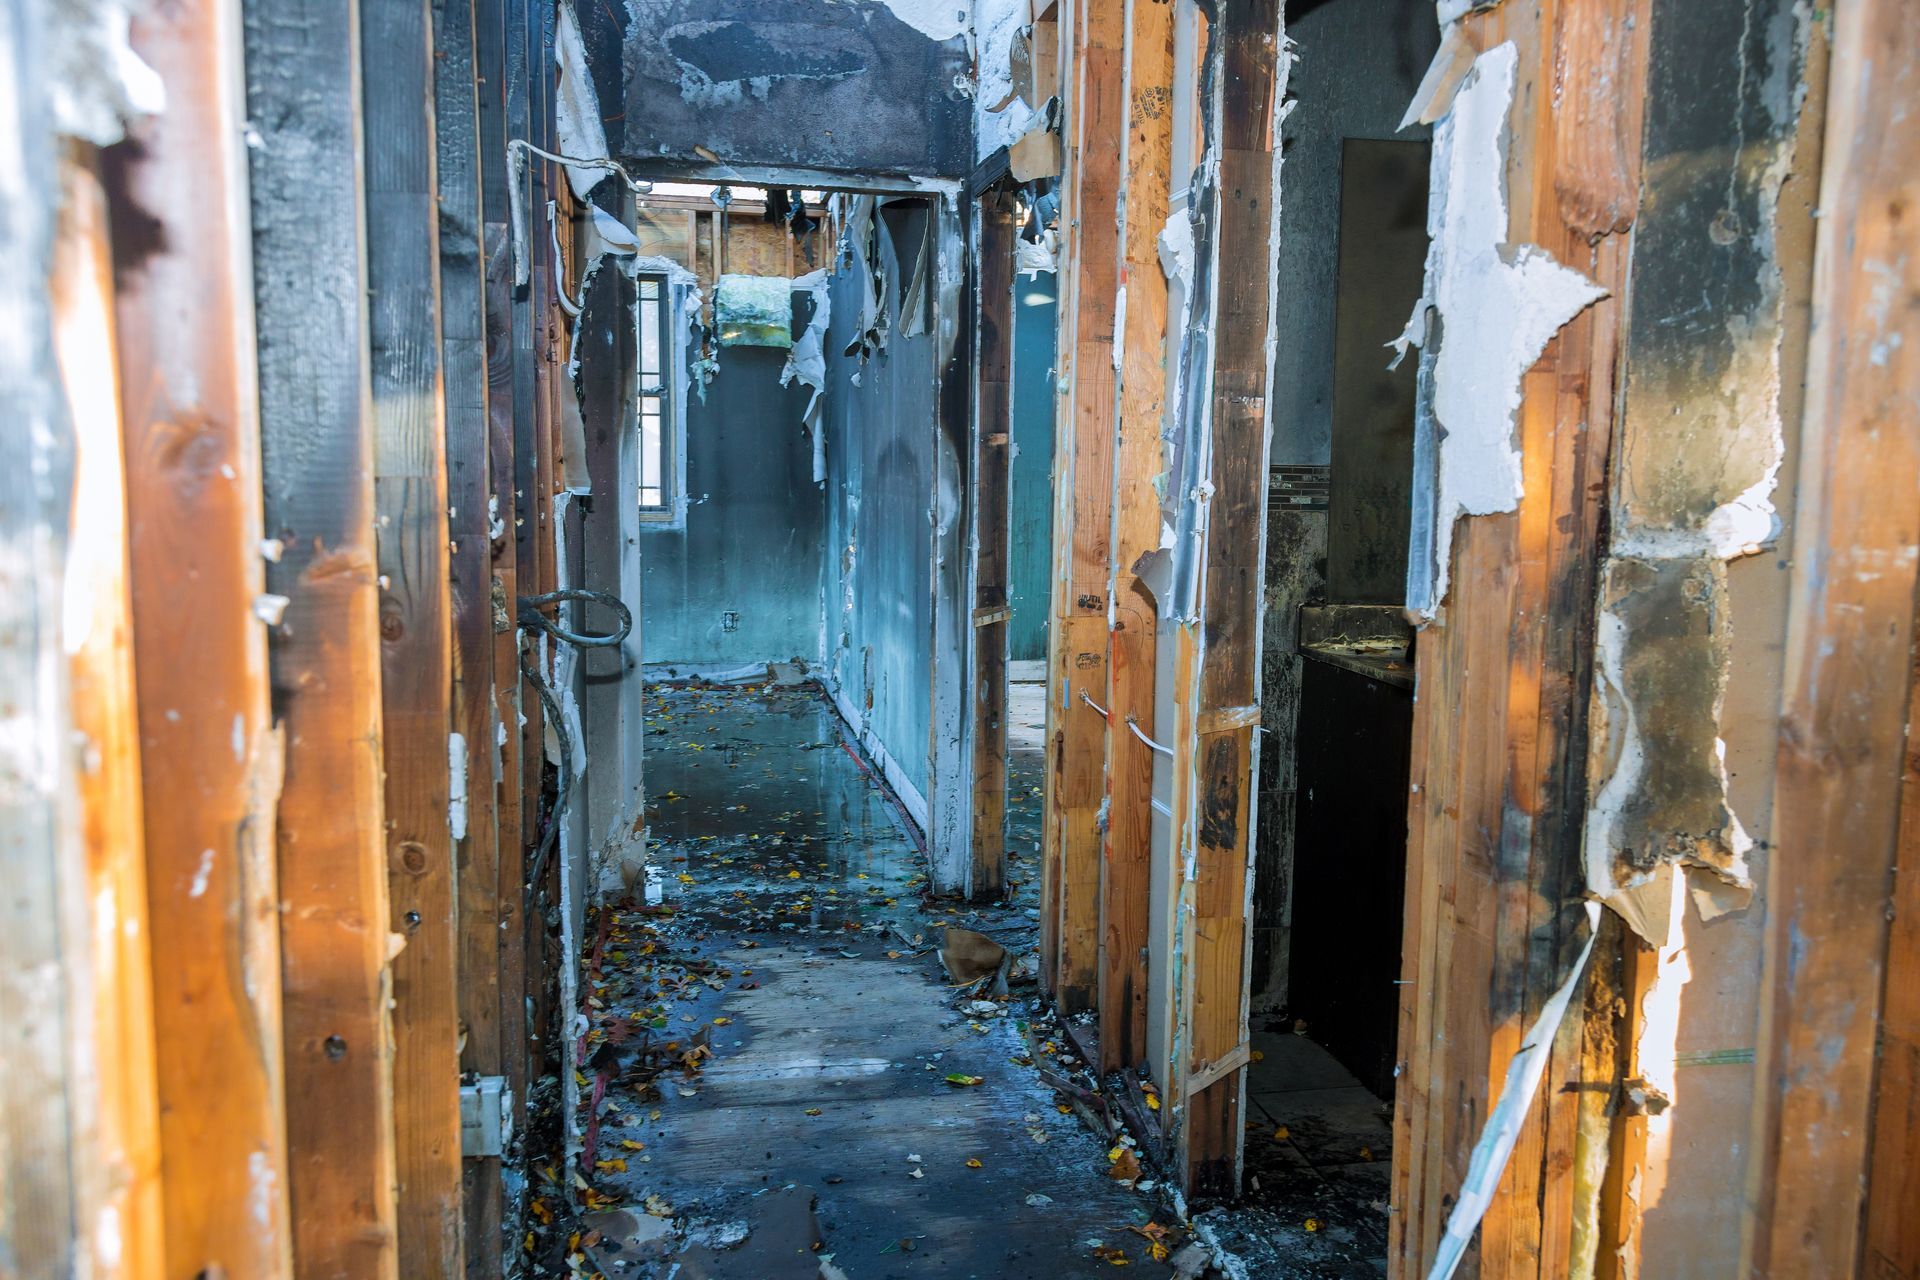
such as floods, plumbing leaks, burst pipes, or even natural disasters like hurricanes. Water damage can be devastating, leading to structural damage, mold growth, and the destruction of personal belongings. Water damage restoration involves a systematic approach to mitigate the damage, remove excess water, dry out the affected area, and restore the property to its pre-loss condition.
Step 2: Safety First
Before starting any water damage restoration work, prioritize safety. Ensure that the electricity supply to the affected area is turned off to avoid
electrical hazards. Wear appropriate protective gear, such as gloves, goggles, and masks, to prevent exposure to harmful substances or contaminants that may be present in the water. If the water damage is extensive or poses significant risks, it's advisable to seek professional assistance.
Step 3: Assessing the Damage
Begin the restoration process by thoroughly assessing the extent of the water damage. Identify the source of water intrusion and determine the type of water involved. Water can be categorized as clean, gray, or black, depending on its level of contamination.
For example, clean water may come from a broken pipe or overflowing sink, while gray water can be from faulty appliances or toilets. Black water is highly contaminated, often originating from sewage backups or floodwaters. Assessing the damage helps in formulating an appropriate restoration plan.
Step 4: Stopping the Water Source
If a plumbing issue causes water damage, shut off the water supply to stop the water flow. Turn off the main water valve in your home or building. If the source is a burst pipe, it's essential to repair or replace the damaged line before proceeding with the restoration process. Stopping the water source is crucial to prevent further damage and minimize the restoration efforts required.
Step 5: Extracting Standing Water
Once the water source is stopped, the next step is to remove any standing water from the affected area. Depending on the extent of the water damage, you can use various equipment for water extraction. Submersible pumps, wet/dry vacuums, and specialized water extraction machines can efficiently remove water from carpets, floors, and other surfaces.
Pay attention to areas that are difficult to reach or hidden, as moisture can lead to mold growth or structural issues if left untreated.
Step 6: Salvaging Personal Belongings
During the water damage restoration process, it's essential to salvage and protect your personal belongings. Move furniture, rugs, and other items to a dry area to prevent further damage. If any items are heavily affected by water or contaminated, consider discarding them to avoid potential health risks.
Valuable or sentimental items should be carefully assessed for restoration possibilities. Quick action is crucial in salvaging personal belongings, as prolonged exposure to water can cause irreparable damage.
Step 7: Removing Damaged Materials
Water damage can often lead to deteriorating building materials such as drywall, insulation, and flooring. In this step, it's necessary to remove the damaged materials to prevent further deterioration and facilitate the drying process.
Start by removing baseboards, trim, and any wet or water-damaged drywall. Wet insulation should also be removed as it can harbor moisture and promote mold growth. Depending on the severity of the damage, you may need to remove portions of flooring or even complete sections of walls.
Step 8: Drying and Dehumidification
After removing damaged materials, it's crucial to dry out the affected area thoroughly. Use air movers, dehumidifiers, and industrial fans to circulate air and speed up the drying process.
Proper drying is essential to prevent mold growth, which can start within 24-48 hours in a moist environment. Monitor the humidity levels with a hygrometer to ensure they are within acceptable ranges. Aim to achieve a relative humidity below 50% to discourage mold growth and promote effective drying.
Step 9: Mold Assessment and Remediation
Water damage often leads to mold growth, posing significant health risks. After drying the area, conduct a thorough mold assessment to identify any signs of mold growth. This includes checking for visible mold, musty odors, or areas with sustained moisture.
If mold is present, engaging professional mold remediation services is crucial to ensure safe and effective removal.
Mold remediation involves:
- Containment
- Proper removal of affected materials
- Thorough cleaning
- Application of antimicrobial agents to prevent future growth
Step 10: Sanitization and Disinfection
Water damage can introduce contaminants and pathogens into your living or working environment. To ensure a safe and healthy space, sanitizing and disinfecting all affected surfaces is important.
Use appropriate cleaning solutions and disinfectants to eliminate bacteria, viruses, and other harmful microorganisms. Pay close attention to areas that have come into direct contact with water, such as floors, walls, and furniture.
Proper sanitization and disinfection help restore a hygienic environment and minimize the risk of illness or infections.
Step 11: Structural Repairs
Once the affected area is thoroughly dried, sanitized, and mold-free, it's time to begin the structural repairs. This step involves replacing or repairing damaged building materials such as drywall, insulation, and flooring. Replace any removed drywall or insulation with new materials and ensure proper installation.
Repair or replace damaged flooring, ensuring it is properly dried before installation to prevent future problems. Engaging professional contractors or specialists for complex repairs or restoration tasks may be necessary.
Step 12: Addressing Plumbing Issues
If a plumbing issue causes water damage, addressing and repairing the underlying problem is crucial to prevent future water damage. Inspect and repair broken or leaking pipes, faulty valves, or malfunctioning appliances.
A qualified plumber can help identify and rectify plumbing issues effectively, ensuring the long-term integrity of your plumbing system and preventing future water damage.

Step 13: Restoring Electrical Systems
Water damage poses a significant risk to electrical systems. Before restoring power, ensure that the affected electrical components, outlets, and wiring have been thoroughly inspected and deemed safe.
If any electrical components were exposed to water, consult a qualified electrician to assess the extent of damage and carry out necessary repairs or replacements. Safety should be the top priority when dealing with electrical systems affected by water damage.
Step 14: Painting and Finishing
Once the structural repairs are complete, it's time to restore the aesthetic appeal of the affected area. Start by priming and painting any walls or ceilings that require repair or replacement. Choose paint that is mold-resistant and appropriate for the specific area.
Ensure the paint is evenly applied, giving attention to detail. In addition to painting, consider restoring other finishes such as wallpaper, trim, or flooring to match the pre-damage appearance.
Step 15: Restoring Carpets and Upholstery
If your carpets or upholstery have been affected by water damage, giving them proper attention is essential. Depending on the extent of the damage, you may need to remove and replace the carpet padding, treat and clean the carpet, or even replace the entire carpet if necessary.
Professional carpet cleaning services can help restore the carpets to their pre-damage condition, removing stains, odors, and bacteria. Upholstered furniture should be thoroughly cleaned and treated to eliminate contaminants or lingering smells.
Step 16: Air Duct Cleaning
Water damage can affect the air quality in your property, particularly if the HVAC system or air ducts have been exposed to moisture. Engaging professional air duct cleaning services can help remove dust, debris, and potential contaminants from the ductwork.
Clean air ducts promote better air circulation, reduce the risk of respiratory issues, and maintain a healthy indoor environment.
Step 17: Odor Removal
Water damage often leaves unpleasant odors, especially if the affected area is not adequately dried or sanitized. To eliminate lingering odors, use appropriate odor-removal techniques. This may include specialized deodorizers, ozone generators, or activated charcoal.
Addressing the source of the odor, such as mold growth or dampness, is crucial to eliminate the odor and prevent its recurrence effectively.
Step 18: Documenting the Restoration Process
Documenting the progress and steps taken throughout the water damage restoration process is important. Keep a detailed record of the damage assessment, photographs, repair work, and any expenses incurred.
This documentation is helpful for insurance claims and serves as a reference for future potential property transactions. Maintain copies of all relevant invoices, reports, and communication related to the restoration process.
Step 19: Communicating with Insurance Providers
If you have insurance coverage for water damage, promptly notify your insurance provider about the incident. To support your claim, provide them with the necessary documentation, such as photographs, reports, and invoices.
Maintain open and clear communication with your insurance adjuster throughout the restoration process to ensure a smooth claims process and maximize your coverage.
Step 20: Implementing Preventive Measures
Once the water damage restoration is complete, it's crucial to implement preventive measures to avoid future water damage incidents. Consider installing water leak detection systems, sump pumps, or backflow prevention devices to minimize the risk of future water-related issues.
Regularly inspect and maintain your plumbing system, appliances, and roof to identify and address potential vulnerabilities. Taking proactive steps to prevent water damage can save you from costly repairs and the stress of dealing with a similar situation in the future.
Step 21: Conducting Regular Inspections
Even after the restoration process, it's important to conduct regular inspections to ensure the long-term integrity of your property. Monitor for any signs of water damage, leaks, or mold growth.
Regularly inspect areas prone to water damage, such as basements, crawl spaces, and bathrooms. Early detection of potential issues allows for timely intervention and prevents further damage.
Step 22: Engaging Professional Help
Water damage restoration can be a complex and challenging process. If you are unsure about any step or encounter extensive damage, it's advisable to seek professional help. Water damage restoration companies have the expertise, equipment, and experience to handle the restoration process efficiently and effectively. They can provide comprehensive services, from damage assessment to mold remediation and structural repairs.
Let Pro-Care Restoration Help Today!
If you have water damage due to a contractor's error, contact a water damage restoration company like Pro-Care Restoration. Our experts assist homes and businesses with plumbing problems caused by burst pipes, appliance leaks, sewage issues, or even natural disasters.
We make sure that the damage is repaired as soon as possible so that you can avoid further damage and mold growth. We make sure that the job is done correctly the first time. Fill out our online form or call us at 336-814-9172.

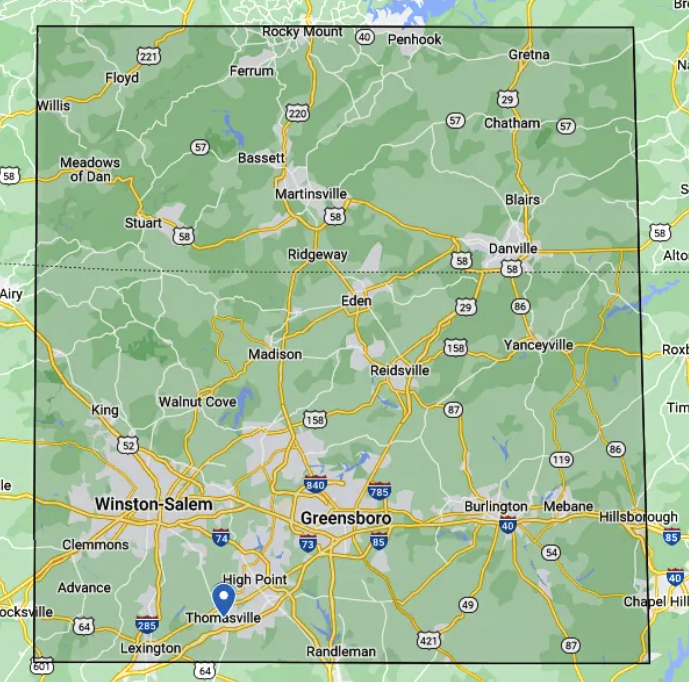
Serving North Carolina
& Southern Virginia
Eden, NC
Madison, NC
Yanceyville, NC
Reidsville, NC
Walnut Cove, NC
King, NC
Winston-Salem, NC
Greensboro, NC
Burlington, NC
Mebane, NC
Hillsborough, NC
Clemmons, NC
Advance, NC
High Point, NC
Thomasville, NC
Lexington, NC
Randleman, NC
Rocky Mount, VA
Penhook, VA
Floyd, VA
Ferrum, VA
Gretna, VA
Willis, VA
Chatham, VA
Meadows of Dan, VA
Bassett, VA
Martinsville, VA
Blairs, VA
Stuart, VA
Ridgeway, VA
Danville, VA
Blogs